
.png)
Postman is a tool used to build, maintain, document and test API’s. It’s like a one stop destination for all API needs. Postman has introduced a new feature called “Flow”, which is an API workflow builder. This feature helps to map out the API’s, chain the responses and visually analyse the API interaction. API’s can be part of any collection within the workspace and should be backed up with “examples”, without examples flow cannot be created. Right now this feature is available for free users too.
Before we start adding API workflow, let us understand some basics.
Pre-Requisites:
- API or List of API’s should be part of collection.
- API’s should have examples linked
- Variables(if any)
How to get to Postman flow canvas?

How to add examples to API ?
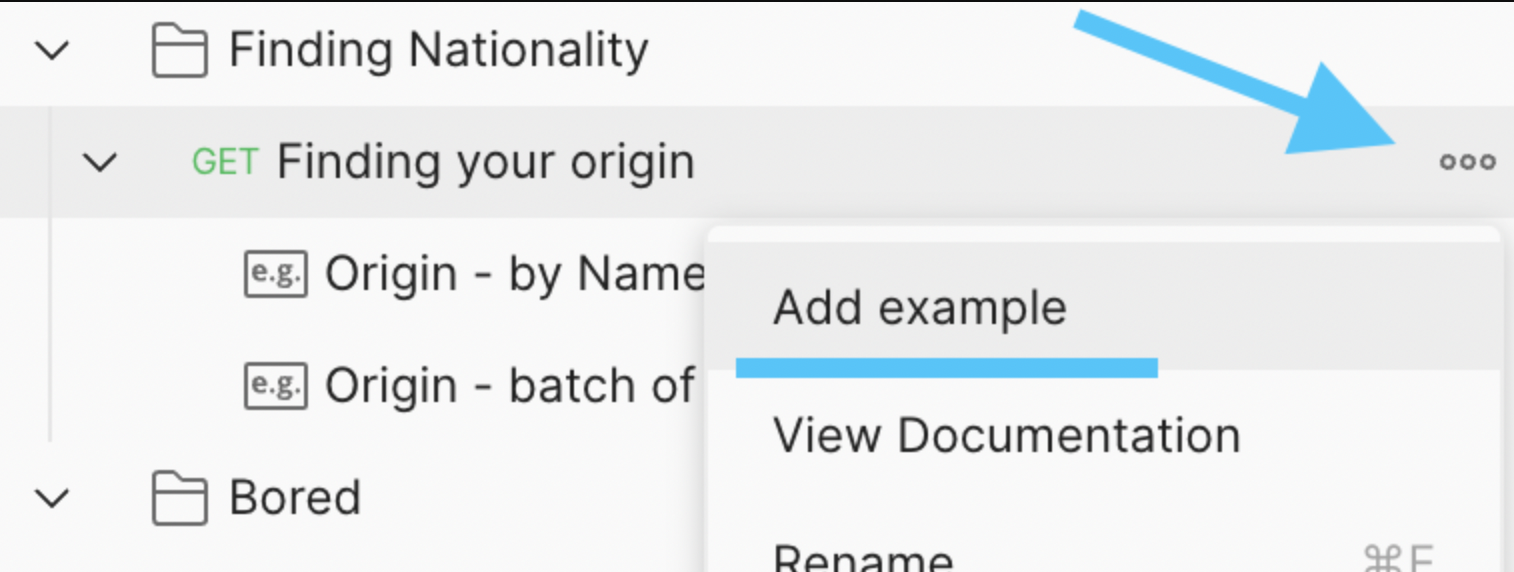
This is a long route, choose any API you would like to create workflow. Click on the 3 dots beside the API, from the dropdown list choose “Add Example”.
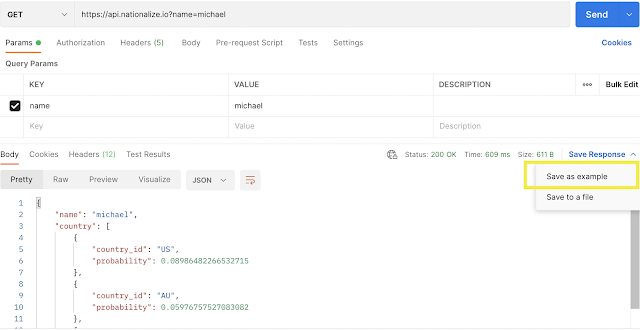
An empty request space will be created, rename the example according to need. Fill up the request details and the response expected. In the below example, the API will fetch probable country match based on the name provided.
Hence in the request you will see the parameter “name=michael”.

Simple way to add example would be to send the request beside the save response we see down arrow click on it. You will be provided 2 options, choose “Save as example” and this will be saved as an example.
Basics
.png)
Blocks
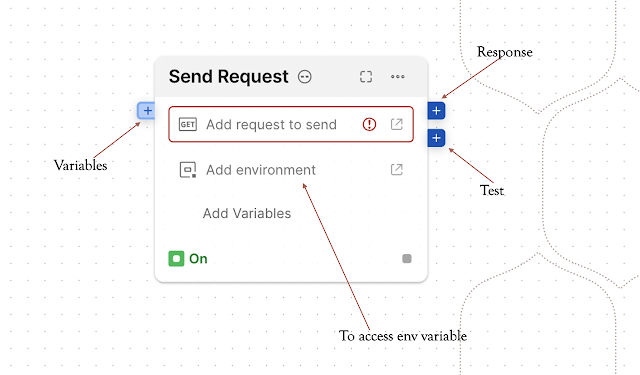
To create API workflow, we have to work with blocks. Block is a basic unit of the flow, this is executed if all the required input is connected. A block is a process in itself and remains as blackbox. Anatomy of a block is as below, each block have an input and output vents which helps in chaining API’s. “Response” outlet carries the data from the API response. “Test” outlet can be used to do some quick checks on API.
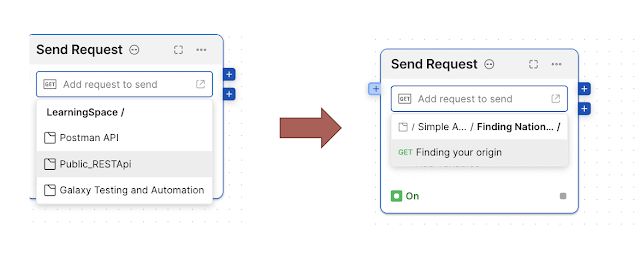
When clicked on “Add request to send” area, it prompts all the collections available in the workspace to choose required API. API’s can be chosen from different collection and need not have to be part of same collection. However, ensure the variables used in the API requests are made available.
Postman provides various blocks, pick and choose the block according to the need of workflow.
Following are the types of blocks currently available
- Tasks
- Value
- Logic
- Boolean Operations
- Arithmetic Operations
- String Operations
- List Operations
- Output
- Other
Terminal:
This block cannot exist on its own, its a dependant block. Terminal block receives data and displays into the terminal. Usually, this block can be used to see the data in terminal to verify on the response data. No functional or business logic can be applied in this block.

Delay:
Delay block can be introduced to induce lags/delays to the API workflow. Again there is no functional or business logic that can be applied into this block. Use this block judiciously, unnecessary delays are not fun ;)

Length:
The Length block can be used to find the length of string. Again this block cannot exist and work on its own. The Length blocks receives an input string and outputs its length

Condition:
This block can be introduced to add come conditions and branch out the actions accordingly. One simple example as below, the condition block checks for the API response statuscode is 200. If True then perform some action, else some other action.

Loop over List
This blocks receives list and loops over each element but outputting one element at a time. One thing to keep in mind before using this block is to ensure the list is extracted before being fed into the “loop over list”.

Alrighty, let’s move forward creating a simple workflow.
API used: https://api.nationalize.io?name=michael
Workflow scenario: Send the request extract country list from the response and output to terminal if the country ID matches “US”.
Add task to send request

Observe the response from the API, find out which key leads to List. From the above screenshot we can find out that “Country” naturally next step would be to extract this list.
First get access to response body using “Select data” block, further chain it with another “select data” to drill it down till “Country”. We have reached the right spot, now its good time to introduce “loop over list” as we can feed the list.

Great ! we are half way through, what next?
We have to loop over the list to find country_id matching “US”. If we find matching entry let us display it in terminal else skip. To achieve this we may have to introduce the “Condition” block


All the above steps are also recorded in this short video .
Comments
Post a Comment